


A Real Plant Doctor you can call mine!
With 3 earned horticulture degrees (PhD, MS, BS), I want to be your very own plant doctor for seasonal tips, intriguing fun gardening, awesome houseplant and premium terrarium DIY projects.
Check here often for the latest or be a free blog subscriber.
There will be columns!

Countless columns
You can also set the number of columns per row and much more from the theme settings.

Responsive Design

~ Font Fiesta ~

Layouts and Templates

Socials Galore

HTML5 + CSS3
There will be posts!
 You can also choose to show your latest posts on the Presentation page. From the theme settings you can select how many posts to show and more will be loaded via an Ajax button.
Even if you can show your latest posts on the Presentation Page, you can also use the Blog Page Template to designate another page as your primary blog posts page. While creating a new page or editing an existing one choose Blog Template as the page template and save.
For more information read all the help sections from the Theme Settings.
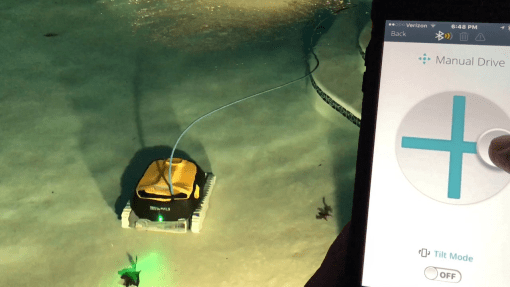
THE Best Robotic Pool Cleaners You Drive With Your Phone
For my money (and time) THE Best pool cleaners you drive with your phone are still the Maytronics Dolphin ™ Oasis Z5i and Triton PS PLUS with PowerStream (PS) and Bluetooth (make sure it is the PLUS). Both these Dolphin™ models have a Bluetooth remote, i.e., your phone. And they are conveniently available on Amazon.com. You can use the links above to see the many reviews on Amazon.com and/or if you decide to buy.

There’s no need to list “5 Reasons Why the Oasis Z5i & Triton PS Plus are THE BEST Robotic Pool Cleaners“. Only ONE reason should suffice to convince you, as it did me, — you can use your cell phone as your remote! Your wife can use her phone. Your kids can use their phone! You just can’t ALL drive it as the same time.
“Where’s that remote?“, is a frustration you’ll never hear again with these Dolphin™ pool cleaners because you (or your spouse and/or your kids) will always have your phone with you. Instead, you might find yourselves fighting over who gets to clean the pool ;-o) .

True, there are cheaper robotic pool cleaners that will likewise clean your pool in automatic mode. Most come with a remote so you can drive it in manual mode. But ALL leave some debris behind. The beauty of these two Bluetooth models is in having a manual mode to get those debris that uses your phone as the remote via the MyDolphin™ app from Maytronics.
Alternatively, you can quickly & conveniently spot-clean your pool in manual mode in a hurry if, for example, unexpected guests are about to arrive. I couldn’t do that with my old pool cleaner.
It easily picked up large sycamore tree leaves in its huge basket while also collecting excess diatomaceous earth (DE) particles that got into my pool. The video above even show success picking up multiple bite-sized chocolate bars to simulate and predict success in a more serious situation ;-o) .
Tired of Changing Your Pool Filter?
What’s more, I didn’t have to change my DE (diatomaceous earth) filter material ONCE all season when I used the Triton to open my pool!!! After a long winter I was able to get the pool really clean with the Triton BEFORE turning on the pool pump for the first time that season. That saved my DE from all that yuck. I couldn’t do that with my old pool cleaner either! And the Triton PLUS kept the pool really clean with relative ease all season long, despite having lots of trees, garden beds and other debris all around the pool. Your results might vary.
Why Robotic Pool Cleaners?

Keeping my pool clean was such a chore, especially after 10 years of ownership. It was getting really old using older technologies and I wanted to move to a house without no pool. But, now it’s really a breeze now with the Triton PS Plus. I just carry the Dolphin™ out every week or after a storm or before having company over to get the pool really clean automatically in just a couple of hours with very little energy. I just need to sweep debris off the steps and into the pool before firing up the Dolphin. Any missed bits of debris can be usually be cleaned by running it again in automatic mode or in manual mode in a few minutes as I drive it using my iPhone.
It does in 2 hours with many times less electricity what it used to take my old pool cleaner all day to do and with a lot more work on my part.
The MyDolphin™ App

The MyDolphin™ App doesn’t have great ratings on the app store. But it works great for me now. I bought my Triton PLUS in August of 2017 and had problems with the app. But, I contacted Maytronics who promptly sent me a new power supply, gratis of course, and I got to keep the original one. That fixed the problem with little hassle. By now, I expect resellers have updated units in stock, especially if you buy it from a company like Amazon.
Another HUGE Benefit — Service
One of the other HUGE benefits of these two Bluetooth models is that MyDolphin™ app setup also allows diagnostic data to be upload to Maytronics over the internet for troubleshooting and generating a tech support email, i.e., they should be able to diagnose what part is causing a problem and send it to you without having to take the unit in to a shop. That’s one of the reasons my technical issue was fixed with little hassle.
It’s key to have a decent wireless signal to your pool area. I can walk 3/4 of the way down the length of my pool and still drive it with ease.
You can conveniently use the links below to see all the reviews of the Maytronics Dolphin ™ Oasis Z5i and the Triton PS PLUS, as well as order the right model if you decide to buy. Doing so will help pay for reviews and videos like this one. Again, be SURE to get the “PLUS” version if you go with the Triton, i.e., the Maytronics Dolphin Triton Plus with PowerStream and Bluetooth.

These are the main Pros/Cons about the Dolphin™ Triton PS Plus:
Pros:
- Use your Phone (iPhone and Android) as a remote via Bluetooth (BT) MyDolphin™ app.
- No firmware updates needed as you would have with a dedicated remote and the MyDolphin™ App is regularly kept updated over the internet.
- Automatically cleans roughly 95% of debris in 2h.
- Quickly and conveniently use manual mode to spot-clean or clean any debris that were missed in regular automatic mode.
- Two alternative manual modes: Touch screen or Tilt feature
- MyDolphin™ app allows diagnostic data from the Dolphin™ to be uploaded over the internet to Maytronics tech support for far more convenient trouble-shooting and repair.
- HUGE, easy-to-clean basket, for leaves and other debris.
- Two included alternative types of filters trap even small DE particles!
- Great with larger debris too, including large sycamore leaves.
- Active Brushing — actually scrubs surfaces — brush operates at ~2x the speed of the robot to actually scrub
- Cleans pool sides AND upper tile
- NOTE: It doesn’t get all of the sides/tiles each 2hr run, but should do so eventually
- Week long timer
- Light weight and drains quickly
- Looks sharp–excellent design
- It’s fun.
Cons:
- Bluetooth app requires initializing and a descent wireless connection, but well worth it.
- Doesn’t do my steps well–best to brush debris off steps into the main part of the pool first.
- The tangle-free cord sometimes isn’t. …that may be due to the odd shape of my pool messing-up their algorithm.
- Large amounts of my deodar cedar needles can clog the opening to the basket in the spring.

These two Dolphin™ models lead the pack of robotic pool cleaners, in my opinion. The convenience of the Bluetooth connection is a tremendous innovation that I think you will love. Not having to change my DE all season long was HUGE. I would certainly buy one again. Now if I could only get it to clean my car…
Links to Reviews:
– Go here to find reviews of the Dolphin™ Triton PS Plus.
– Go here to find reviews of the Dolphin™ Oasis Z5i.

myPlantDr.com is a participant in the Amazon Services LLC Associates Program, an affiliate advertising program designed to provide a means for sites to earn advertising fees by advertising and linking to Amazon.com and Audible.com.
Copyright (C) 2019 by myPlantDr
DIY Restore of Corroded Aluminum Alloy Wheels
 Before and after pics of a partial restoration of alloy wheels where sanding was feathered beyond the lug nut area followed by a full whole wheel restoration of a similarly corroded canyon wheel/rim on the right. The before image is after stripping the factory polyurethane coating.
Here’s a do-it-yourself (DIY) method for restoring corroded aluminum alloy wheels to a mirror-like shine using the popular stock canyon rims of the Jeep® Wrangler TJ, as well as the original aluminum alloy wheels on a 2000 Honda® Odyssey. Detailed steps can be modified for other yard and garage aluminum restoration applications.
Maybe I should stick to horticulture, but I love my Jeep® Wranglers. And now I love their canyon rims with a whole new look.
 Originally painted black by the previous owner because it was so corroded and pitted in numerous areas, I restored this entire canyon rim using these methods after the black paint was removed with acetone. Mounted on the back so some lugs are missing.
Even though the “canyon” rims are a common stock rim for Jeep® Wrangler TJ, the shine achieved by this DIY restoration process really makes them uncommon. Not only will they look new, but the canyon alloy wheels will look really different with a mirror-like shine in addition to the machined aluminum look between the spokes — better in my opinion. This difference could be enhanced, of course, by painting the unpolished regions to make unique combinations.
What do you think? And let me know what ways you find that work better and I’ll update.
I’m planning a video, if there is interest. Several existing YouTube® videos were helpful that show removal of the alloy wheel’s polyurethane coating with stripper and the sanding or polishing of aluminum via different methods. But nothing this comprehensive and soup-to-nuts that I could find.
Despite many promises out there, I did not find any quick-fix silver-bullets to restore scratched, pitted and/or badly corroded aluminum surfaces. I discuss one of them at the very end of this post. But, you can make them like new with a mirror-like finish by simply sanding with an inexpensive low-speed sander-polisher across a range of increasingly finer grits and then polishing with aluminum metal polish. Then either crystal-clear-coat them or keep them polished and waxed. Each wheel takes several hours and some effort — effort made a whole lot easier with the right power tools.
You may already have a lot of the tools and materials, but I’ve also researched the best value tools and materials readily on Amazon.com®, most with 2-day shipping. Let me know if you find better ones.
Here are the high-level steps that I did. These will be followed by some explanation and then by the same outline with all the details, my own lessons learned and best practices that I found in the method to help you do DIY right the first time around.
 Restored whole canyon rim — sanded with 150 grit between the polished spokes — protected with wax.
High-level Steps:
- Prepare work area & alloy wheel
- Clean/degrease
- Strip-off the polyurethane clear-coating and any paint from the whole wheel
- Sand, as needed, inside the holes for the lug-nut
- Sand between spokes
- Sand center, spokes and rim with low-speed sander-polisher and full range of grits
- Aluminum polish until shiny
- Either wax or de-wax/degrease & coat with crystal clear paint
- Remount tire
Disclaimer: I’m not an auto-industry professional. On the other hand, if can do it without any prior experience and some arthritis in my shoulders and elbows, then so can you. Obviously, use these steps/ideas at your own risk, both from a personal property and health standpoint. Wear old clothes you wouldn’t mind being ruined. Be sure to follow all manufacturer labelled directions and warnings even if I do/did or not. A high quality dust mask is key and I didn’t do any sanding without it! Of course, safety goggles, ear protection and protective gloves will be needed. A kneeling pad, for sitting and kneeling, and/or knee pads are helpful. I’ve tried to think of everything, but you’ll need your own common sense and a working knowledge of working with automobiles, tires, jacks, power tools and etc.
Each wheel takes a few hours and there is some cost for the sandpaper, tools and other materials you don’t already have. A fairly complete list of recommended items is at the very end for items you don’t have.
It’s not-too strenuous with the right power tools. I’m a 5′ 9″ 163 pound 50-something male with arthritis in my shoulders, elbows, knees, etc. I actually found it therapeutic — feeling better in the days following than I had in a long time. So, if I can do it, most can, especially if you pace yourself.
The first “After” photo is a partial job where I feathered the sanding out just beyond the lug holes. The bottom photo is my first whole rim job.

I did dry sanding, The flexible pad with hook & loop attachment of sandpaper that I will recommend made it easy to feather into spots.
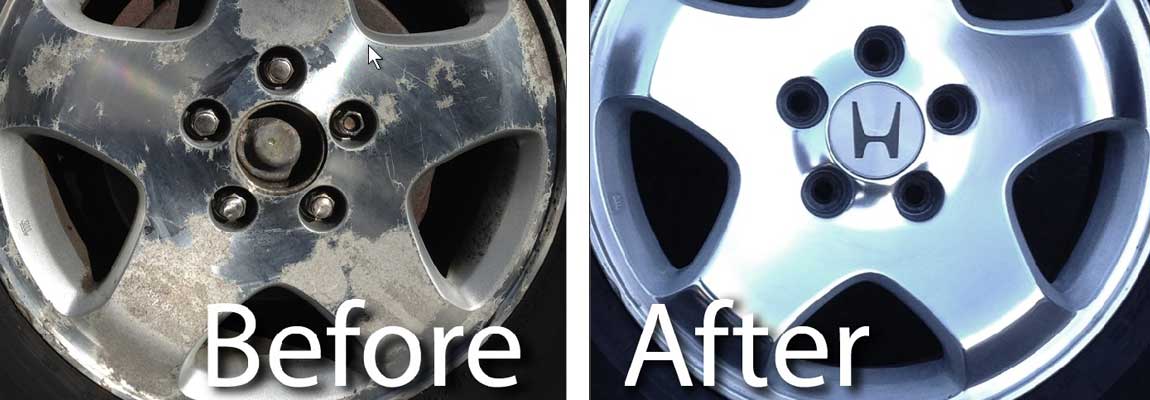 Before and after of same wheel from my 2000 Honda(R) Odyssey, including a new Honda(R) center cap. The before image is after stripping the polyurethane coating.
Using a low-speed sander-polisher is key. On my first attempt, I made the mistake of trying a dedicated 11,000 rpm grinder that I had on-hand. It shredded the pad on the first wheel. So, I bought an inexpensive variable-speed 1,000-3,000 rpm sander-polisher. There’s little sign of wear on the pad after doing multiple alloy wheels and the sandpaper lasts well too. Sure, a cord-powered drill could be used, but I expect it would bounce around the rim too much and be more tiring to control. A sander-polisher you stability and the proper angle. You also want to be able to set-it-and-forget-it on the low speed, which the sander-polisher does well.
Detailed Steps:
Note that each step is key!
1. Prepare work area & wheel
- Mark position & remove balancing weight(s)
-
- Before removing, mark position on tread of tire with a permanent marker and/or take a picture of its position relative to lettering on the tire.
- Preferably jack car so tire can rotate. I recommend use of jack stand(s) and wheel chucks on an automatic in park on level ground for obvious safety reasons.
-
- If jacked, to get around the issue of protruding lug nuts, remove all but a single lug nut or other nut that size that does NOT extend beyond the wheel’s surface, for obvious reasons, and don’t’ forget to put the other lug nuts back when done before lowering the jack.
-
-
- Spinning freely is best, but not necessary. I was able to achieve this by mounting on the rear of my Honda® Odyssey in park. On my automatic TJ, the front wheel turns in park with effort (not with sanding), which is good enough.
-
-
- Alternatively, working with the tire off and on the ground works too. But bending over the wheel is less ergonomic for me. I’m don’t know what you could do safely with the tire on a manual transmission vehicle. So this may be your only option if your tires are too big to fit on another suitable car. It does, however, get around the protruding lug nut issue.
- Protect valve stem
- If the valve stem is longer than most, consider yourself lucky — you can carefully push it back and put a stick between it and the insides of the wheel to keep it out of the way. Otherwise, you may just need to be careful to avoid it — but, make sure your tires have enough air to start ;-o). I sanded a couple of them shorter before I clued-in. But, they still took in air with a bike-pump.
- Tires — unless replacing your tires, you may want to mask them or have them removed from the rims.
- I didn’t worry about that and had only minor effects on the tire surface. But, it is possible that the stripper used below, which can drift and/or run, could leave marks or hurt white lettering if it gets on it (didn’t on mine) or that sanding could scuff them if not careful It is important to wash-off any stripped polyurethane from the tire before it dries or it may have to be stripped-off later.
2. Clean/degrease
- I use a degreaser to remove wax, dirt, and road-film — you don’t want to sand that stuff into the metal or gum-up your sand-paper.
- Rinse well and let dry — hitting it with a leaf-blower speeds-up the drying process.
3. Strip-off the polyurethane clear-coating and any paint from the whole alloy wheel
- I don’t think it will look good to strip only part of the polyurethane even if you only have to sand the inner part. I stripped the entire rim.
- NOTE: I didn’t do the back of the wheel, but you might consider doing that at the same time and then clear-coating the back after the last step regardless of whether you wax or clear-coat the front. Some clear-coat will come off the back rim anyway from over-spray if you use the stripper spray.
- I sprayed with premium polyurethane “Stripper”. Plan on about 1 can for every two tires. I didn’t do it, but you may also want to spray the back side, as well, because some stripper will get through to the back and take off part of the polyurethane coating anyway. You’ll want to use a crystal clear coat on the back side, regardless whether you polish or coat the front, because it is too difficult to polish and wax the back on a regular basis.
- Leave on for a good 15 minutes. You may even see in come off in sheets.
- Wet the tire rubber first and then hose or power-wash-off the stripper, including any residue off the driveway or any other valuable surface.
- Rinse, dry & repeat, as needed to remove all of of the polyurethane coating.
4. Sand, as needed, inside the holes for the lug-nuts
- Be sure to where a good dust mask & safety goggles. Heavy gloves are also recommended.
- I found that 100 grit sand paper taped onto a cone-shaped polishing attachment via a drill, gave a nice machined look that contrasted with the outer polished areas that looked especially great after waxing to protect and putting in brand new lug nuts at the end. Look out for the sandpaper coming loose. Wrapping it in the right direction (direction the drill turns) will minimize this.
- You sand these holes first because it is easy to scratch the outer wheel surface in the process. If you do, that will be sanded-out in the next step. I had to learn this the hard way
5. Sand between spokes
- For a machined look between spokes, sand those areas with coarse sandpaper (80-120 grit) in the same horizontal direction.
- NOTE: Originally, when I did my wheels, I sanded between the spokes AFTER the next step. But it’s better to do this step first to avoid scratching those smooth-sanded areas.
- Folded sandpaper squares work well for large areas.
- Spiral sanding rolls/cones work best for tightly curved hard-to-get-to inner areas.
6. Sand center, spokes and rim with low-speed sander-polisher and a full range of grits

- Again, be sure to where a good dust mask & goggles. Heavy gloves are also recommended.
- I think it looks best to sand the entire smooth surface of the wheel like I did in the 2nd AFTER picture and subsequent pictures above. I used an inexpensive variable-speed 1,000-3,000 rpm sander-polisher at 1,000 rpm (sometimes 2,000) in one direction concentric with rim. In the first AFTER picture, the wheel was only corroded in the middle, so I feathered-out my sanding just beyond the corroded center area in the “After” picture shown above going out just a little further each time with increasingly finer grits. I think it looks even better to do the whole smoothed area of the wheel though. But, that is more work.
-
- NOTE: A high speed grinder (e.g., 11,000 rpm) will shred your sanding pad.
- They say it is best to start with the highest grit that will remove the problem(s) and every subsequent grit used thereafter is to smooth-out the scratches left by the previous grit. If you can still see the pitting or ribbing (stock canyon rim surface texture) after a few passes, then either keep sanding or step down to a lower grit.
-
- To find the highest grit that still worked to remove the corrosion damage, I experimented with the worst wheel on my old 2000 Honda® Odyssey that had heavily corroded areas. Starting with rubbing compound did almost nothing to remove the pitting. I thought starting at 400 grit would do it. But when it was all done ending with 2000 grit, I could still see the ghosting of the oxidation damage where it was worst when I was all done and I wished I had started with 80 grit and patiently worked through each subsequent sequential grit to 400 before going through to 2000. Nevertheless, it was good enough for my old minivan not to do it all over. But, I recommend starting at 80 grit if your wheel is heavily corroded or deeply scratched. That is what I did on subsequent minivan alloy wheels. You don’t want to get to the end and still see scratches and the ghosts of corrosion.
- If you start at a grit higher than 80 and find that it is not removing all the lines or is taking too long (or using more than one sheet of sandpaper at the same grit) then back-up to a lower grit until it comes off fairly easy. To efficiently remove the groove texture on all over the smooth surfaces of the Canyon rims I had to start with 80 grit even though that seems harsh. But, a couple or three passes with each subsequent grits listed below produced a smooth almost scratch-free surface that polished to the mirror-like shine you can see in the pics.
(A) Hit the very worst areas first, especially dings and such to smooth those first with your lowest grit used.
(B) Do the ribs, noting which part of the wheel you start on, like the rib next to the valve stem, or you’ll end-up duplicating effort unnecessarily.
My best practice was to put my leg against the wheel to keep in from spinning and start at the top of each spoke and go down with the pad with some bend in it at 1,000 rpms and feather off at the center of the wheel. Then turn the wheel a little and go down the flat surface between the ribs. Then do the next rib and so on all the way around. Repeat one or two more times all the way around and do the outer part of the wheel and any other areas you want smooth before going on to the next grit.
(C) You’ll also need to do the outer areas of the rim.
-
-
-
- You may need to sand the outermost part by hand to avoid scratching the tire.
-
-
-
-
-
- Be careful not to hit the tire or areas in between the 5 ribs/spokes.
-
-
-
-
-
- NOTE: Some YouTube videos recommend having the wheel spin while sanding and working your way down from outer to inner. Except for the outer rim areas where it was helpful, I did not find letting the wheel spin freely to work well on these alloy wheels having 5 large ribs/spokes — it left noticeable concentric waves.
-
-
-
-
- I used sequential grits of 80, 180, 320, 400, 600, 800, repeat 800, 1200, 1500, 2000 available on Amazon.com® separately as sets of hook and loop 6″ discs
-
-
-
-
- 800, 1200, 1500 and 2000 grits, all for use on a 6″ flexible backing plate or pad.
- Start with a brand new sandpaper disc in each grit-step even though your disc should still be capable of sanding after the few passes you’ll need for each grit. Otherwise, expect to still see scratches from a previous grit when you are all done. If you see browning that remains after repeated passes, then you probably need a fresh piece of sandpaper.
-
-
- Repeat steps A to C and with each sandpaper grit all the way up to 2,000 grit.
- Rinse off any residue
- Touch-up sanding between spokes
- The last step will likely smooth some of the areas that you sanded in the previous step with coarse sandpaper. Re-sand those areas with coarse sandpaper for an even machined appearance.
-
7. Aluminum polish until shiny
- I used Mother’s® Mag & Aluminum Polish on the same areas sanded with the sander-polisher using a Black & Decker® WP900 6-Inch Random Orbit Waxer/Polisher to which I added Velcro® in order to use Meguiar’s® DFP6 6″ DA Foam Polishing Disc for hook & loop polishers.
- Be sure the pad is pre-moistened with water.
- Wipe blackened excess with a clean cloth between polishes.
- Rinse (pad and wheel) and repeat several times until achieving desired shine.
- Pad should be rinsed between repeats. I put a little dish soap in the rinse water.
- Repeat, as needed, to desired shine.
-
- Don’t place any cover over the foam polishing disc mentioned above — it works fastest all by itself using the polish.
-
- Use these tools and polish for touch-ups in the future too unless you top with a crystal clear coating.
8. Either wax or de-wax/degrease & coat with crystal clear paint
- Wash entire rim and dry
- Either wax all wheel surfaces (used Mother’s® carnauba wax over the entire wheel) or degrease and coat with crystal clear paint.
- Regardless of which you do to the front, it is probably a good idea to use crystal clear paint on the back side of the wheel if you stripped the polyurethane away. I haven’t tried this yet, so let me know what you recommend.
9. Remount tire
- Restore:
- balancing weights;
- valve stem position and cap; and
- lug nuts to recommended specs.
-
- Consider new center caps
-
-
- Center cap for canyon rims (NOTE: matches original texture and finish — let me know if you find a generic center cap with more of a mirror finish that fits these alloy wheels)
-
WARNING: Be careful NOT to let harsh tire cleaning solutions, especially any containing bleach, get on your finished uncoated wheels. Wax will probably not protect them from that and you’ll probably have to re-polish.
List of Materials and Tools:
[ ] degreaser
[ ] stripper (spray)
[ ] 80, 180 and 320 assorted automotive grits — 6″ hook & loop sandpaper discs,
[ ] 400 grit,
[ ] 600 grit,
[ ] optional but recommended repeat of 800 grit
[ ] 800, 1200, 1500 and 2000 grits
[ ] 6″ flexible backing plate or pad
[ ] variable-speed 1,000-3,000 rpm sander-polisher
[ ] Mother’s® Mag & Aluminum Polish
[ ] Black & Decker® WP900 6-Inch Random Orbit Waxer/Polisher
[ ] Velcro® (large size, but it has many other uses)
[ ] Meguiar’s® DFP6 6″ DA Foam Polishing Disc
[ ] good dust mask
[ ] safety goggles
[ ] kneeling pad
[ ] cone-shaped polishing attachment
[ ] corded drill
Another Method for Convoluted Wheel Surfaces that Aren’t Badly Corroded, Scratched or Pitted
One particular method that looked the most promising for a quick fix uses the Nylalox® aluminum oxide coated nylon brush used in a method mentioned on www.WranglerForum.com. But, the aluminum oxide-infused nylon brushes I tried (80 grit coarse and fine) did NOT provide a quick-fix. Both scratched the aluminum much like sandpaper — they’re just not supposed to wear out as fast as wire brushes. But, they would be useful to target small areas that are hard to reach with the 6″ circular sanding pad I used. And I can see why they’d be useful on the convoluted aluminum pattern of the alloy wheels shown in the method linked above having many places a pad might not reach. They might also be more selective at removing the softer oxidized aluminum with less scratching of the surface. But, I question whether they’d remove the pitted surfaces from heavier corrosion that I encountered — pitting I removed efficiently with relative ease using equivalent grits of sandpaper on a sander-polisher.
myPlantDr.com is a participant in the Amazon Services LLC Associates Program, an affiliate advertising program designed to provide a means for sites to earn advertising fees by advertising and linking to Amazon.com and Audible.com.
Copyright (C) 2015 by myPlantDr
There will be more!
So bring out your diamond in the rough and let Nirvana find its luster.